Showing posts with label easy. Show all posts

Tuesday, 18 August 2015

Guest writing for another blog and super cute DIY sign

Hello!!!!!
This blog post was originally written by me for a blog called Sophiesuite (https://sophiesuite.wordpress.com/), but I decided to give you guys a special preview before anyone else! It would be brilliant if all you crazy dinocorns out there would check her out!!


My good friend, Sophie - who I'm 95% sure is secretly my sister- invited me to guest write a page of her blog for her! Those of you avid bloggers out there will know that this is an enormous responsibility, imagine someone trusting you to read their diary or guard their secret stash of chocolate- that big! How could I turn down such an opportunity? 

The only brief I was given was to make my entry crafty, so after some brainstorming, I came up with the perfect DIY! This post will show you how I went about creating this super cute and sparkly sign. This project was really inexpensive and easy to do, it could be displayed on the back of your bedroom door or you could even attach a piece of dowel/a pencil to the back of it and place it in a vase. The possibilities are only limited by how far your imagination is willing to stretch!

To make your own, you'll need:

• A small, plain sign (I got mine off of amazon)
• Some PVA glue, you won't need much
• A pencil and black marker
• Some sparkly bits (eg. Glitter, sequins or gems)

1) Remove all of the labels and stickers from your sign.

2) Now draw or write out the outline of what you want on your sign- I chose the words "official unicorn".

3) I learnt that it's best to fill the words or design in with your marker at this point, as it is hard to apply marker on top of glue.

4) Spread glue on to one area of the sign at a time, it is much easier to apply glue to the sign and not to the back of each individual gem.

5) Place your gems (or other sparkly things) around the edge of your design and leave it to dry.

That's it! It really is as easy as that! If you try this DIY for yourself, be sure to send me a picture on Instagram (@unicornasauruss) I would love to see what you come up with, or you could share your master piece with Sophie on her tumblr (sophiesuite)

Happy crafting! 
xo~ Daisycorn

Saturday, 16 May 2015

Cute Hairstyles For School/Sports/Dance

Hiya beautiful people!!
As you have more than likely grasped by the title, this post will centre around super easy. versatile, hair styles- that will also take minimum effort, yet still look really cute.

1| USE A HAIRAGAMI!!
   If you don't know what one of these is, it's a bit like a snap-bracelet, but for your hair! You can get so many effortless looks from this one nifty devise! I personally find these so much: easier, quicker and neater to use than a bun donut or going free-hand. Not only can you create beautiful, long-lasting buns- but also other unique styles, like a hair piece that looks like a pretzel... THATS RIGHT A PRETZEL! You can probably tell that I love me a Hairagami (in-fact, I own five!). 

Method for a Hairagami bun
  1) Put your hair into a ponytail where you want your bun to be.
  2) Place the Hairagami at the end on your ponytail.
  3) Roll the Hairagami up the ponytail until you reach the bobble.
  4) Now slowly snap the Hairagami, so that you are in control of what your bun looks like.
  5) (Optional) Decorate your bun with flowers or ribbon to add a girly touch.

You can purchase these from Claire's for £9, personally I think that that's expensive for what it is- which is why I ordered mine from Amazon for under half the price!

2| Dutch Plaits!
   There are many variations of Dutch plaits: Dutch crown, singular Dutch plait ect. My personal favourite is just simple, Dutch pigtail plaits. They are brilliant for keeping your hair out of your face, for dance it's a good idea to make them into a pair of low buns because the plaits can hit you in the face when you pirouette.

Method for Dutch pigtail plaits
  1) Part your hair in the centre of your head.
  2) Secure the hair on one side of your parting using a bobble or crocodile/butterfly clip.
  3) Grab three sections at the front of your hair.
  4) Begin to plait your hair, instead of moving the outside pieces over the middle piece, move the middle piece over the outside pieces.
  5) Add more pieces gradually- much like a French plait.
  6) Once all of your hair, from that side, has been added- continue to plait your hair to the end and secure with a bobble or elastic.
  7) Repeat on the other side of your head.

The plaits look amazing with bobbles that contrast the colour of your hair- it just brings something extra to the look!

3| Crown Twist Plait!
   I first learnt about this look on YouTube ( http://www.youtube.com/watch?v=5wUthYQXES8 ). When I tried it, I was pleasantly surprised by how easy and pretty it turned out; I received many compliments from friends and family, here's how you can recreate it yourself.

Method for Crown twist plait
  1) Part your hair in the centre.
  2) Grab a piece of hair by your left ear.
  3) Start to rope plait it going around your head towards the right, keeping the hair close to your scalp.
  4) Add more hair to the plait as you get to it- the plait should still be close to your scalp.
  5) When you run out of hair to add, just rope plait it to the end and secure with an elastic.
  6) Wrap that end piece over the start of the plait and took the end underneath the plait.
  7) Keep in place by crossing two hair grips.
This look is very secure and is unlikely to come out during sports or dance!

*these are NOT our pictures!*

That's all, I hope you try out these looks on yourself and if you do, be sure to send us your pictures to our Instagram!  (@unicornasauruss https://instagram.com/unicornasauruss/ )
xo~ Daisycorn 


Sunday, 18 January 2015

DIY with Washi tape2

Hiya, Daisycorn here!

So you may have read my last Washi tape DIY ( http://unicornasaurus.blogspot.co.uk/2015/01/diy-with-washi-tape-1.html ) this time around, I'll be teaching you a really: simple, cute and effective way to design and create beautiful greetings cards to give to friends and family on any occasion. You could even use this method to make a "thank you" card for your favourite teachers, as it is approaching the end of the school year.

Equipment:
                      -Plain card
                      -washi tape
                      -printer paper
                      -gel pens and sparkly things (optional)


Method:

1| Print or draw out a basic shape onto the the printer paper. This will later be the design on your card. DO NOT CUT OUT THE IMAGE!

2| Cover the picture in alternate strips of Washi tape. Do this on the back of the printer paper so that you can still see what the shape is meant to look like. Also only cover the part of the paper that you're using so that you don't waste your tape.

3| Now  carefully cut out the shape.

4| Stick the design onto the card- so that only the Washi side is showing. You could experiment with where you place the design.

5| You could now extend the design be adding details in gel pen or other decorative extras. In the image above, I places rhinestones down the body of the butterfly and at the top of the antenna's- which I drew on in gel pen. If you placed the design in the corner, you might decide to write the person's name in the centre of the card using glitter glue or stickers.

6| repeat the process on other cards so that you have an emergency stack, ready for any event!

I hope you have fun presenting your very own cards to the special people in your life!
xo~ Daisycorn


Thursday, 1 January 2015

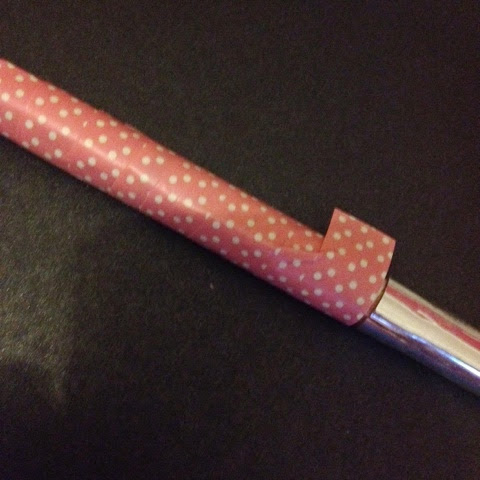
DIY With Washi Tape 1 ~ Lipgloss

Daisycorn here! 
So recently I've fallen in love with a form of patterned paper tape known as "Washi Tape" (you've more than likely heard of it if you are as obsessed with YouTube as us)
  This is a quick DIY tutorial which is both practical and fun! I think all of us makeup lovers have been in that situation when that "cute" and "useful" transparent container has seen better days- here's an easy way to revamp your old favourite lip gloss; or other makeup product, to make it more appealing to look at!

Equipment:
                 -Lip gloss (near the end of it's life)
                 -Washi Tape (obviously ;-D)
                 -Scissors (not essential)
                 -PVA glue (also not essential)
Method: 
 1| lay out all of your equipment on your work surface area.
2| Starting from the bottom of the lip gloss, wrap the Washi Tape around horizontally, either tearing after each time the tape has gone once around, or wrapping at a slight angle.
3| Once at the top you could remove the lid and cover the lip gloss in PVA glue to create a "glossy" finish and protect the tape from tearing and water damaged. I skipped this step for the purpose of this tutorial.
4| Repeat with the lid in a different colour. (Not essential.)
5| The lip gloss is now ready for use; enjoy!!
xo~Daisycorn